software YiCanMain

Manual

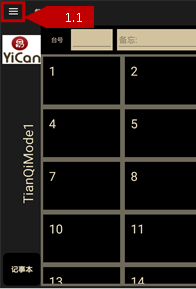
Restaurant mobile management software, which can run on various mobile devices, involves all aspects of management.
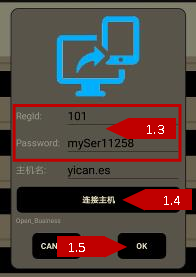
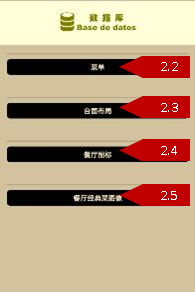
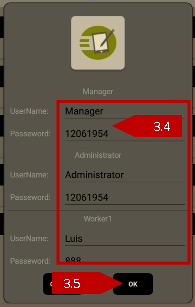
Some settings need to be made before using this software. First, connect to the host and update the database.

Software configurations

Software configurations Before using this software, you must make some settings. The first is to connect the YiCan service and the second is to update the database and configure the printer.

1. — Connect with the YiCan Service

1.1 — Click on the icon in the upper left corner of the "Service" page and select "System Settings".
1.2 — After entering the system configuration page, unfold the list and click on the "SERVICIO DE YICAN.ES" button at the bottom to enter a new window

1.3— Fill in your restaurant ID (Regld) and password in the YiCan service window. Note that the default server name is yican.es.
(Note: If you have not yet ordered the YiCan Service, please contact us first, the mobile phone / WeChat contact information is +34 636847833, the website is www.YiCan.es If you just want to try this software, please keep the value default in image 1.3)
1.4 — Click "CONNECTING TO SERVER" and see the answer.
1.5 — Click the "OK" button to exit the window.

2. — Download or update data from the server.

2.1 — Click on the icon in the upper left corner of the "Service" page and select "Data Update" to enter the new page.
2.2 — Click on "THE RESTAURANT'S MENU" to download and update the details on the restaurant's menu.

2.3 — Click "BASIC SETTINGS" to download and update basic restaurant setup data.
2.4 — Click on "RESTAURANT LOGO" to download and update the restaurant icon.
2.5 — Click "PHOTOS OF FEATURED DISHES" to download and update detailed information such as menu images.

3. — Printer Configuration

3.1 — After the “Service” page, click in the upper left corner of the icon, select "System Settings" to enter a new one page.
3.2 — After entering the System Configuration page, click "PRINTER CONFIGURATION" to enter a new window.
3.3 — This software supports up to four physical / virtual printers. You can configure them by swiping left or right in the window.
(Note: When configuring, a printer can be used for multiple purposes in practice. For example, a printer can print customer invoices and beverage notes.)

3.4— You can modify the printer name in the "Name" in the window.
3.5 — Below the "Name" line, you can set the purpose of the printer.
(Note: "Print Main" refers to the main printer, which is primarily responsible for printing tickets and invoices.)
3.6 — Next, fill in the printer's IP address. Usually default Port and GoNum
3.7 — Click on the test print page to test the print. If the printer prints the content, the printer setup is successful.
3.8 — After configuring, click the "OK" button to exit the window.

4. — Return to the "Service" page

4.1 — Click on the icon in the upper left corner of the software to select "Service" to return to the "Service" page.

Custom settings

Before you start using the software, you can also customize some settings.

1. — Customize the software theme

1.1 — In the upper left corner of the “Service” page, click on the icon, select "System Settings" to enter a new page
1.2 — After entering the System Configuration page, click "CHANGE THEME" to enter a new window.
1.3 — Select your favorite topic and click the "OK" button to exit the window.

2. — Customize the software language

2.1 — Click on the icon in the upper right corner of the "Service" page and click on "Select Language" to enter the Select window language.
2.2 — Click on the language used and click the "OK" button to save and exit the window. The software will automatically change the language of the software immediately.
(Note: The software will use the default language of the device system as the initial language of the software.)

3. — Edit password

3.1 — Click the icon in the upper left corner on the "Service" page and select "System Settings".
3.2 — After entering the system configuration page, click "EDIT PASSWORD" to enter a new window.

3.3 — You must enter the highest level administrator password (Manager) to enter the window. The default value is 12061954.
3.4 — After entering the password edit window, you can modify all passwords.
3.5 — After changing the password, click the "OK" button to exit the window.

User manual

1 — How to start a ticket for diners.

1.1 — Enter the "Ticket" page

1.1.1 — Click on the square with the dining table number in the dining table list on the left side of the "Service" page to enter the "Ticket" page. (The list can be displayed)
1.1.2 — Click on the takeaway number in the "Takeaway" list on the right side of the "Service" page to enter the Takeaway "Ticket" page. (The list can be displayed)
1.1.3 — On the right side of the "Service" page, the arrow icon can be seen to the left and right of the word "Takeout". You can use them to search for other services.

1.1.4 — Click on the square with the dining table number in the "Terrace / Others" list on the right side of the "Service" page to enter the "Ticket" page. (The list can be displayed)
1.1.5 — There is detailed information under the dining table number. At the same time, there will be different colored squares to indicate their current status. White represents busy dining table and golden yellow represents paying.
1.1.6 — You can also enter the "Ticket" page by directly entering the dining table number. enter the number of the dining table where you want to start the ticket and click "Enter" to enter the "Ticket" page.
(Note: The "Takeaway" ticket must have "-" in front of the number, or the "Terrace or Others" ticket must have "+" in front of the number.)

1.2 — Make a ticket with the menu

1.2.1 — There is a menu list at the top of the "Ticket" page (vertical device) or on the left (side device). On the left is a list of categories, and on the right are dishes from that category.

1.2.2 — Select a category, and choose the dish.
1.2.2.1 — If the quantity is one, simply double-click the name of the dish.
1.2.2.2 — If the quantity is equal to or more than two. Click the name of the dish, enter the amount at the bottom of the "Ticket" page (vertical device) or at the bottom right (horizontal device), and click the "Enter" button.

1.3 — Make a ticket with the menu number

1.3.1 — There are number keys at the bottom of the "Ticket" page (vertical device) or at the bottom right (side device).
1.3.2 — Use the numeric keypad to enter the plate number in the "Code" box.
1.3.2.1 — If the quantity is one, simply click the "Enter" button.

1.3.2.2 — If the quantity is equal to or more than two. Enter the quantity and click the "Enter" button.
1.3.2.3 — If there is a letter suffix after the plate number. After entering the numerical part of the plate number, click the "*" button and enter the letters.
1.3.3 — If the plate number is incorrect, click the "Backspace" button to return to the modification.

1.4 — Enter temporary menu

1.4.1 — In the "Code" box, click the "*" button to enter the temporary menu window.
1.4.2 — Fill in the name of the dish and the price in the window.
1.4.3 — Click the "OK" button to exit the window.

1.5 — Edit the menu package

1.5.1 — First register the menu package to the ticket list.
1.5.2 — Click on the name of the menu package in the list of the ticket to be edited.
1.5.3 — Double-click the plate name box above the keyboard to enter the menu package edit window.
1.5.4 — You can see some messages in the menu package edit window.
1.5.4.1 — You can see the number of packages in the upper left corner of the menu package edit window.
1.5.4.2 — At the top of the menu package edit window is the menu list that the package has.
1.5.4.3 — After clicking on the name of the dish to be replaced, a replaceable menu list will appear at the bottom of the window.

1.5.4.3.1 — Click on the name of the replaced plate and then modify the quantity by adding or subtracting.
1.5.4.3.2 — If the name of the plate to replace does not appear in the replaceable list. You can click on any dish name in the list and then click on the menu number to change the number. In the end modify the quantity.
1.5.4.4 — If you need to continue editing the package, you can repeat the steps in 1.4.4.3. 1.5.4.5 — After editing the menu package, click the "OK" button to exit the window.
(Note: You can continue to edit the package without leaving the "Order" page. But the replaced chainring cannot be modified again. If you want to modify it, you need to remove the package menu and restart the steps from 1.5.1)

1.6 — Make message for kitchen

1.6.1 — Make kitchen messages for the ticket list menu.
1.6.1.1 — Click the menu name of the ticket list.
1.6.1.2 — Double-click on the dish name box to enter the kitchen message window.
1.6.1.3 — After filling out the kitchen message, click the "Enter" button on the system keyboard.
1.6.1.4 — If you use pre-installed kitchen messages. Enter the first few letters of the pre-installed message to select one from the list below. The pre-installed message can also continue to be modified. After confirming, click the "Enter" button on the system keyboard.
(Note : Only the steps of making a cooking message to a new plate added to the ticket are valid. When you re-enter after leaving the “Ticket” page, the dishes on the ticket will not be able to perform the steps in 1.6.1. )

1.6.1.5 — If necessary, you can also click the "SAVE" button in the window to save the new cooking message.
1.6.2 — Make a kitchen message for the menu that is not on the ticket list.
1.6.2.1 — Click the "INFOS" button on the keyboard to enter the kitchen message window.
1.6.2.2 — Enter the plate number and click the "Enter" button on the system keyboard.
1.6.2.3 — Repeat 1.6.1.3 or 1.6.1.4.
(Note: You can modify the cooking message repeatedly before exiting the “Ticket” page. but there can only be one message per plate, and you cannot add the cooking message to a package menu.)

1.7 — Delete or modify the amount of ticket plate

1.7.1 — Remove the plate from the ticket
1.7.1.1 — Click on the plate you want to delete in the ticket list.
1.7.1.2 — Click the "Delete" button.
1.7.2 — Modify the amount of ticket plate
1.7.2.1 — On the ticket, click on the name of the dish whose quantity you want to modify.
1.7.2.2 — Use the plus and minus buttons to adjust the number of dishes.

1.7.3 — Delete the ticket

1.7.3.1 — Use the numeric keypad to enter 9999 in the "Code" box and click the "Enter" button. If the menu is printed to the kitchen, a confirmation window will appear to notify the kitchen.
1.7.3.2 — The program will delete the ticket and automatically return to the "Service" page.
(Note: Printed tickets cannot be deleted)

1.8 — Edit number of diners or the address of takeaways

1.8.1 — Edit number of diners
1.8.1.1 — Click the "Edit" button on the ticket to enter the window.
1.8.1.2 — Enter the new quantity and click the "OK" button.
1.8.2 — Edit takeaway address
1.8.2.1 — Click the "Edit" button on the take-away ticket to enter the window.
1.8.2.2 — Fill in the customer's phone number. If the phone number is already registered, the address will be automatically filled in, but can be changed. The new customer's takeaway address information will also be recorded along with the phone number.

1.8.2.3 — Complete the address. If the street name has been pre-installed in the program, just enter the first letters of the street to select the street from the list.
1.8.2.4 — If it is a new street name, you can also save it to the list of pre-installed street names by clicking the "SAVE" button in the window.
1.8.2.5 — Fill in the number and the door.
1.8.2.6 — After filling in and confirming customer information, click the "OK" button to save and exit.

1.9 — Kitchen impression

1.9.1 — Manual Kitchen Printing
1.9.1.1 — Finish the ticket first, edit the package menu and cook message.
1.9.1.2 — Click the "Kitchen" button to enter the kitchen print window.
1.9.1.3 — Choose the dishes you need to print in the kitchen now. If it is all dishes, click the “ALL” button. (Note: They will show all dishes from the package menu)

1.9.1.4 — After selecting, click on the “SUBMIT” button to exit the “Order” page. You will print the dishes that have been selected in the kitchen print window when you exit the page. You can also print the other dishes later.
1.9.2 — Automatic Kitchen Printing
1.9.2.1 — Finish the ticket first, edit the package menu and cook message.
1.9.2.2 — After clicking the "Exit" button to exit the "Ticket" page, the program will automatically print to the printer all dishes and kitchen messages that have not been printed in the kitchen.

2 — Customer Order

"Customer Order" is an auxiliary function of this software. The main objective is to receive customer orders through our other software.

2.1 — After receiving a sales order, the program will automatically print the order and will notify you with a ringtone.
2.2 — At the bottom (vertical device) or on the right (horizontal device) of the "Service" page, you can see the icons with arrows to the left and right of "Takeout". You can use them to find the "Customer Order" subpage.
2.3 — Click on the order in the list to enter the Customer Order page.
2.4 — At the top of the page you can see the order's dining table number. The list at the top (vertical device) or on the left (horizontal device) of the page is the content of the order. At the bottom (vertical device) or on the right (horizontal device) of the page there are other information that the order has.

2.5 — Click the "DELETE" button on the page to delete the order.
2.6 — Click the "PRINT" button on the page to print the order.
2.7 — Click the "RECEIVE" button on the page to convert the order into a ticket or add it to the existing ticket.
2.8 — Click the "CONFIRM" button on the page to exit the page.
2.9 — When the restaurant is busy and you do not want to receive orders, you can click "PAUSE" at the bottom of the "Customer Order" sub-page. Click again when you need to turn it on.
2.10 — When you want the program to automatically receive orders, you can click "AUTOMATIC" at the bottom of the "Customer Order" sub-page. Click again when you need to close.

3 — Takeaway Online

"Takeaway Online" is an auxiliary function of this software. The primary goal is to receive takeout orders through our other software or web pages.

3.1 — After receiving a take-away order, the program will automatically print the order and notify you with a ringtone.
3.2 — At the bottom (vertical device) or on the right (horizontal device) of the "Service" page, you can see the icons with arrows on the left and on the right for "Takeout". You can use them to find the "Takeaway Online" subpage.
3.3 — Click on the order in the list to enter the online take away page.
3.4 — The list at the top (vertical device) or on the left (horizontal device) of the page is the content of the order. At the bottom (vertical device) or on the right (horizontal device) of the page there are other information that the order has.
3.5 — Click the "DELETE" button on the page to remove the takeaway order.
3.6 — Click the "PRINT" button on the page to print the take-away order.

3.7 — Click on the "CONFIRM" button to accept the take-away order. Once the order is accepted, the content will automatically print in the kitchen. And you can print and collect the ticket.
3.8 — Click on the "TICKET" button to print the ticket.
3.9 — Click the "PAY" button to collect. (Note: Takeaway Online also supports takeaway management features, specific usage can be seen in 8.2)
3.10 — Click the "Takeaway Gift" button to enter the Takeaway Gifts edit page.
3.11 — Click the "EXIT" button to return to the "Service" page.
3.12 — When the restaurant is busy and you do not want to accept takeaway orders, you can click the "PAUSE" button at the bottom of the "Takeaway Online" sub-page. Click again when you need to turn it on.
3.13 — You can enter the restaurant gift editing page by clicking the "EDIT GIFTS" button at the bottom of the "Take Away Online" subpage.

4 — Divide the ticket

This function is for when you need to divide a ticket into several.

4.1 — Select the ticket for the dining table you need to divide. Click the "SPLIT" button to enter the window.
4.2 — Click “ADD” or “DEL” to make or delete a new ticket。 (Note: New tickets use currently unused dining table numbers and use numbers from highest to lowest.)
4.3 — Move it to the new ticket by clicking on the dish name in the list above (vertical device) or to the left (horizontal device).
4.4 — If more divisions are needed. Repeat steps from 4.2-4.3.

4.5 — If a plate needs to be removed from the new ticket. Simply move it to the original ticket by clicking on the dish name in the list below (vertical device) or to the right (horizontal device).
4.6 — The total at the top of the window is the total of the original ticket, and the total at the bottom of each list is the total after division (the total after division does not include VAT)
4.7 — When finished, click "OK" to exit. After exiting, the program will return directly to the "Service" page.

5 — Print ticket or invoices and collect payments

5.1 — Print ticket
5.1.1 — Click on the dining table number to enter the "Ticket" page.
5.1.2 — Click the "PRINT" button to print. The program will automatically return to the main page.
5.2 — Print invoices
5.2.1 — Click on the dining table number to enter the "Ticket
5.2.2 — Click on the “Total” button to enter the invoice details window.
5.2.3 — Fill in the NIF / CIF and the name of the client at the top of the window.
5.2.4 — Click the "PRINT" button to print. The program will automatically return to the main page.
5.3 — Collect payments
You must print the ticket before collecting payment.
5.3.1 — Click on the dining table number you are charging to enter the "Ticket" page.

5.3.2 — Click on the “Total” button to enter the invoice details window.
5.3.3 — Click the "PAY" button to enter the collection window
5.3.4 — In the upper part of the window, the total of the invoice appears. "Pending" refers to the amount that has not yet been collected. "Change" means change.
5.3.5 — Click on the "Delivered" line to enter the figure and click "Enter". If the number you are entering is the same as the total, click on the "Delivered" line and then click "Enter" directly on the system keyboard. Last select the payment method below.
5.3.6 — You can collect multiple times until the pending payment is zero. At the same time, you can also save the way of each payment.
5.3.7 — You can also remove a payment from the payment list. After clicking the payment box in the payment list, you can delete the payment after confirming in a confirmation box that appears.
5.3.8 — Once payment is complete, click the "OK" button to exit the window.

6 — Change dining table number

6.1 — On the "Service" page click on the icon in the upper right corner and select "Change table" to enter the window. < br> 6.2 — Enter the number of the dining table to change in the window and click "Enter." Then enter the new dining table number and click "Enter." 6.3 — After confirming, click the "OK" button to exit the window.

7 — Reserve

7.1 — Click on the icon in the upper right corner of the "Service" page to enter the reservation window.
7.2 — Fill in the customer's name, customer's phone number, number of people, meal reservation hours, and information in the window.
7.3 — After filling in, click the "Add" button in the window. The newly added reservation will appear in the list at the top of the window (vertical device) or on the left (transverse device).

7.4 — You can also delete or modify the reservation by clicking on the "DELETE" or "MODIFY" button in the window after clicking on the reservation in the list.
7.5 — When the moment of the reservation approaches, you will receive a message from the system, verify it.
7.6 — Click "OK" to exit the window.

8 — Accounts

8.1 — Current Tickets

You can view all tickets, payment methods, totals and other information operated today through "Current Tickets".
8.1.1 — On the "Service" page, click on the icon in the upper right corner and select "Current Tickets". Enter the administrator password to enter the page.
8.1.2 — At the top of the page is information such as totals.
8.1.3 — The list at the top of the page (vertical device) or on the left (lateral device) is your current ticket list.
8.1.4 — After clicking the ticket in the ticket list, the list at the bottom of the page (vertical device) or on the right (horizontal device) is the detailed ticket information.

8.1.5 — Below the detailed ticket information list is the ticket payment method information.
8.1.6 — Click the "PRINT" button on the page to print a copy of the ticket.
8.1.7 — Click on "MODIFIED TICKET" to enter the window to see the list of modified tickets. Modified tickets refer to tickets that have been repeatedly revised after tickets have been printed and consumption has decreased. So you can check if there is a problem with these tickets. Click the "OK" button to exit the window.
8.1.8 — When finished, click the "OK" button to return to the "Service" page.

8.2 — Management of takeaways and payment

Takeaway management is an auxiliary tool for restaurants and takeaway delivery staff to centrally settle the amount of takeaway.
(Note: Centralized payment only supports cash payments. Finish charging with your credit card or other payment methods before using the takeout management feature.)
8.2.1 — Click the icon in the upper right corner of the "Service" page and select "Takeaway" to enter the page.
8.2.2 — If you are using takeout management for the first time, you may need to edit the employees first. Click the "EDIT DELIVERY" button on the page to enter the window.
8.2.3 — After filling in the name and phone number of the delivery person at the top of the window, click the "ADD / UPD" button to add. Click on the name in the list below to change it, and click the "DEL" button to remove the delivery person.
8.2.4 — At the top of the page is the number and total of takeaways.

8.2.5 — The list at the top of the page (vertical device) or left (horizontal device) is the list of takeaway tickets.
8.2.6 — After clicking on the takeaway ticket, a list of takeaway delivery personnel appears. Designate a delivery person for the ticket and click "OK" to exit the window.
8.2.7 — Repeat 8.2.6 until you have assigned a delivery person to each take-away ticket and click "TOTAL CALCULATE" to calculate.
8.2.8 — The results of the calculation will be shown in the list at the bottom of the page (vertical device) or on the right (lateral device)
8.2.9 — Click on the name of the delivery person to enter the payment collection window.
8.2.10 — Enter the actual amount of cash received in the payment window and click "Enter" to verify the change in balance. If the actual amount received is equivalent to the account receivable, you can directly click the "cash" button to settle. After settlement, click "OK" to exit the window.
8.2.11 — When finished, click the "OK" button to return to the "Service" page.

8.3 — Close the day

8.3.1 — Click the icon in the upper right corner from the "Service" page and select "Close the day". Enter the administrator password to enter the page.
8.3.2 — At the top of the page is information such as totals.
8.3.3 — The list at the top of the page (vertical device) or on the left (lateral device) is your current ticket list.
8.3.4 — After clicking the ticket in the ticket list, the list at the bottom of the page (vertical device) or to the right (horizontal device) is the detailed ticket information.

8.3.5 — Below the detailed ticket information list is the ticket payment method information.
8.3.6 — Click the "PRINT TICKET" button on the page to print a copy of the ticket.
8.3.7 — After clicking the "CLOSE THE DAY" button, today's tickets will be printed and stored in the database.
8.3.8 — When finished, click the "OK" button to return to the "Service" page.

8.4 — Billed Summary

On the "billed summary" page, you can see all the tickets / invoices stored in the past. At the same time, you can also export to a file or print the summary of these invoices.
8.4.1 — On the "Service" page, click the icon in the upper right corner and select "Billed Summary" to enter the page . 8.4.2 — At the top of the page, set the date range where you need to find the ticket.
8.4.3 — After setting the start date and end date, click the "LOAD DATA" button.
8.4.4 — The list at the top (device vertical) or left (device horizontal) of the page is the list of tickets within the date.

8.4.5 — After clicking the ticket in the ticket list, the list at the bottom of the page (vertical device) or to the right (horizontal device) is the detailed ticket information.
8.4.6 — Click the "PRINT TICKET" button on the page to print a copy of the ticket.
8.4.7 — Click the "EXPROT" button on the page to enter the window. After setting the date range in the export window, you can choose to export the data to a printer or an XML file.
8.4.8 — Click on the "CLEAR" button to enter the window. In the window you can delete your invalid or expired tickets. Select the end date (the program will automatically delete the day before the end date you selected) and then click "THE TICKETS" or "ALL INVOICES" (all invoices). Then click the "OK" button to exit the window.
8.4.9 — When finished, click the "OK" button to return to the "Service" page.

8.5 — Trade statistics

8.5.1 — Click on the icon in the upper right corner on the "Service" page and select "Business Statistics" to enter the page.
8.5.2 — Set the date range you need to use the statistics at the top of the page (vertical device) or left (horizontal device).

8.5.3 — After setting the start date and the end date, select the statistical format you need. Then click the "LOAD DATA" button.
8.5.4 — Statistical results will appear in the list at the bottom of the page (vertical device) or on the right (horizontal device).
8.5.5 — You can click the "PRINT" button to print the statistical results.
8.5.6 — When finished, click the "OK" button to return to the "Service" page.

9 — Pre-installed street names

9.1 — Click the icon in the upper right corner of the "Service" page and select "Edit street names" to enter the page.
9.2 — Click on the icon in the upper right corner of the page to enter the window to enter the street name.
9.3 — After entering the street name in the window, click the "SAVE" button to save and exit the window.

9.4 — Repeat action 5.3 to pre-install multiple street names.
9.5 — You can also pre-install the new street name by clicking the "SAVE" button in the edit take-home address window when filling in the take-away information. For more details, see 1.8.2.
9.6 — Delete the street name. Click on the saved street name to enter the window and click the "DEL" button to remove the street name.
9.7 — When finished, click the icon in the upper left corner of the page to return to the "Service" page.

10 — Pre-install kitchen notes

10.1 — Click on the icon in the upper right corner from the "Service" page and select "Kitchen Notes" to enter the page.
10.2 — Click the icon in the upper right corner of the page to enter the window.
10.3 — After filling in the note in the window, click the "SAVE" button to save and exit the window. Be brief when completing the note, so that the result is better when printing.

10.4 — Repeat action 6.3 to pre-install more cooking notes.
10.5 — You can also pre-install new kitchen notes by clicking the "SAVE" button in the kitchen message window. See 1.6 for the specific method.
10.6 — Delete the kitchen note. Click on the saved kitchen note to enter the window and click the "DEL" button to delete the note.
10.7 — When finished, click the icon in the upper left corner of the page to return to the "Service" page.

11 — Notepad

If you need to record something, you can do it through the notebook function.
11.1 — Open Notepad. On the "Service" page, click the "NOTEPAD" button to enter the page.
11.2 — Click the icon in the upper right corner of the notebook page to enter the window.

11.3 — After filling in the content in the window, click the "SAVE" button to save and exit the window.
11.4 — Repeat 9.3 actions to add multiple notes.
11.5 — Delete notes Click the saved note to enter the window and click the "DEL" button to delete the note.
11.6 — When finished, click the icon in the upper left corner of the page to return to the "Service" page.