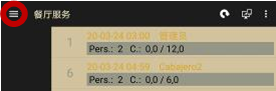
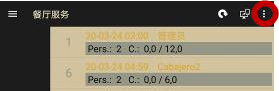
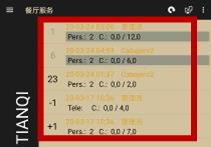
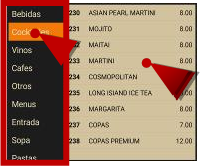
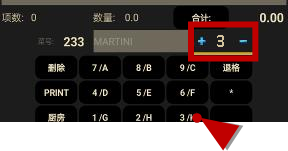
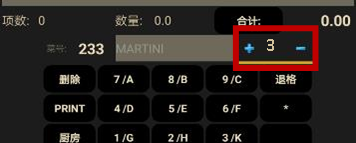
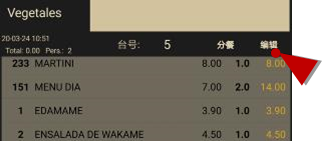
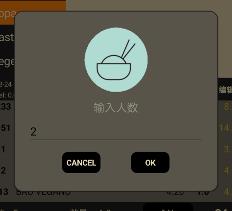
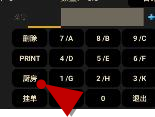
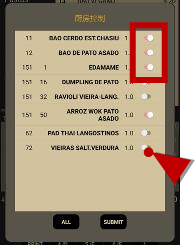
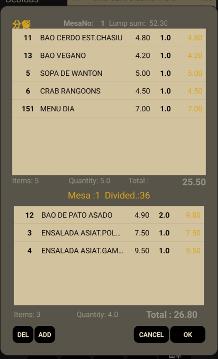
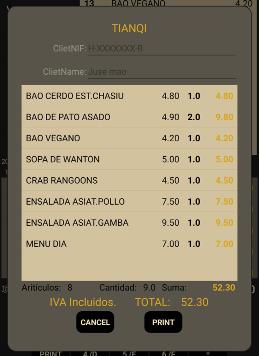
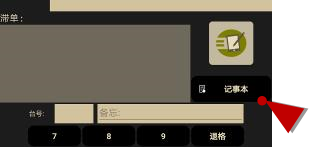
YiCanNota It is a billing software for a series of restaurant mobile device software.
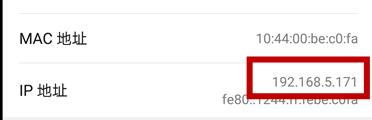
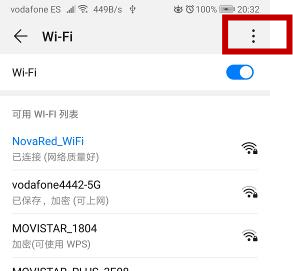
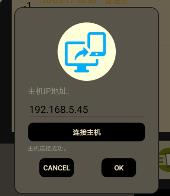
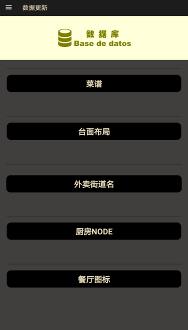
Before using this software, you need to make some settings: first you need to connect to the restaurant host and update the database.
1.1 — Configure the device's WiFi network. In searching for the device's Wi-Fi network, select the same Wi-Fi network as the server.
1.2 — Find the IP address of the server. (In Android: 1-Settings 2-Wireless and networks 3-Wi-Fi 4-Click the icon in the upper right corner of the screen 5 — Wi-Fi settings)
on the "Service" page to enter the server IP address setting window. And edit the server IP address.
1.4 — Click the Connect to Server button , after viewing the reply message, click the OK button to exit.
(Note: When editing the server IP address, be careful not to have spaces between the numbers.)
2.1 — Click on the icon in
the upper left corner of the "Service" page to select the data update and enter
the database page.
2.2 — Click on "MENU" to update the restaurant menu data.
2.3 — Click on "BASIC SETTING" to update the basic restaurant settings.
2.4 — Click on "STREET NAME" to update the street name data for take-away services.
2.5 — Click on "KITCHEN NOTE" to update the pre-installed messages for kitchen.
2.6 — Click on "RESTAURANT ICON" to update the restaurant's logo.
3.1—Haga clic el icono en la esquina superior izquierda del software, selecciona servicio para volver a la página "Service".
1.1 — Click the icon in the
upper right corner of the "Service" page to choose your favorite theme.
2.1 — Click on the icon
in the upper right corner of the "Service" page, select Language
to enter the language selection window.
2.2 — Click on the language you are using and click OK to save
and exit the window. The software will automatically change the
language of the software immediately.
(Note: The software uses the default language of the device system as the initial language of the software.)
(Note : To make a take-away order note, put a "-" before the number. And to make a special order note, put a "+" before the number.)
1.1.1 — If you are returning to a saved order note for a table, you can directly click the table number located at the top of the "Service" page (vertical device) or on the left side (device horizontal).
1.2.1 — The letter list is at the top (vertical device) or on the left side (horizontal device) of the "Order" page. On the left side is the list of categories, and on the right side are the dishes in that category.
1.2.2 — First select category, and then search for the dish in the list.
1.2.2.1 — If the plate quantity is only one, simply double-click the plate name.
1.2.2.2—Si la cantidad es dos o más, haga clic en el nombre de plato e introduce
la cantidad en debajo (dispositivo vertical) o abajo a la derecha
(dispositivo horizontal) de la página "Pedido". Y luego haga clic en el teclado "Intro".
1.3.1 — The number keys are below (vertical device) or at the bottom right (horizontal device) of the "Order" page.
1.3.2 — Enter the plate number in the Code box using the numeric keys.
1.3.2.1 — If the plate quantity is only one, click the "Enter" button
1.3.2.2 — If the plate quantity is two or more, enter the quantity and click the "Enter" button.
1.3.2.3 — If it is a plate number with a letter as a suffix.
Click the "*" button after entering the part number, and then enter the letter
1.3.3 — You can use the "Backspace" button to correct the error if you enter a wrong number.
1.4.1 — First you need to put the menu in the order basket.
1.4.2 — Click on the menu you want to edit in the order basket.
1.4.3 — Double-click the plate name box at the top of the keys to enter the package edit window.
1.4.4 — You can see this information in the package editing window
1.4.4.1 — Package menu quantity in the upper left corner.
1.4.4.2 — List of dishes that has the package menu at the top of the window.
1.4.4.3 — When you have chosen a dish from the top list, a list that can be substituted appears at the bottom.
1.4.4.3.1 — Click on the name of the replaced plate and modify the quantity by adding or subtracting.
1.4.4.3.2 — If the dishes to be replaced do not appear in the replaceable list. You can click any plate name in the list and then click the plate number to modify the plate number. In the end modify the quantity.
1.4.4.4 — If you need to continue editing the package, you can repeat the steps in 1.4.4.3.
1.4.4.5 — After editing the package, click OK to exit the window.
(Note: You can continue to edit the package without leaving the "Order" page. But the replaced chainring cannot be modified again. If you want to modify it, you need to remove the package menu and restart the steps from 1.4.1)
1.5.1 — Add a cooking message to a dish in the order basket.
1.5.1.1 — Click on the name of the dish in the order basket.
1.5.1.2 — Double-click on the plate name box at the top of the keys to enter the kitchen message window.
1.5.1.3 — Enter the kitchen message and click the "Enter" button on the system keyboard.
1.5.1.4 — If you use pre-installed kitchen messages. Enter the first few letters of the pre-installed message to select one from the list below. The pre-installed message can also continue to be modified. After confirming, click the "Enter" button on the system keyboard.
(Note: The steps of adding a cooking message to a dish that is in the order basket are only valid when the dishes are new added. When you re-enter after leaving the "Order" page, the dishes in the order basket will not be able to perform the steps in 1.5.1. )
1.5.2 — Add a cooking message to a dish that is not in the order basket.
1.5.2.1 — Enter the plate number, click the "Enter" button on the system keyboard.
1.5.2.2 — Repeat steps 1.5.1.3 or 1.5.1.4.
(Note: You can modify the kitchen message repeatedly before exiting the "Order" page, but there can only be one message per plate. Unable to add cooking message to a package menu.)
1.6.1 — Remove dishes from order
1.6.1.1 — Click on the plate you wish to remove from the order basket.
1.6.1.2 — Click the "Delete" button.
1.6.2 — Modify the order quantity.
1.6.2.1 — Click on the plate you want to change its quantity.
1.6.2.2 — Use the plus and minus keys to adjust the number of dishes.
1.6.3 — Delete ticket
1.6.3.1 — Enter 9999 in the Code box using the numeric keys.
1.6.3.2 — The program removes the order and automatically returns to the "Service" page.
(Note: Tickets that have already been printed as ticket or invoice cannot be deleted. )
1.7.1 — Edit number of diners
1.7.1.1 — Click the Edit button in the order basket to enter the edit diners window.
1.7.2 — Edit takeaway address
1.7.2.1 — Click the Edit button in the takeaway order basket to enter the edit takeout address window.
1.7.2.2 — Fill in the customer's phone number. If the phone number is already registered, the address will be completed automatically. But it can be modified. The customer's new address is also registered with the phone number.
1.7.2.3 — Complete the address. If the street name is stored on the server, simply fill in the first few letters of the street to select the street from the list.
1.7.2.4 — Fill in the house door number.
1.7.2.5 — After completing and confirming the customer's address, click OK to save and exit.
1.7.2.6 — Complete street with saved street names
1.8.1 — Print kitchen ticket manually
1.8.1.1 — First complete the order basket, edit the package menu and the kitchen message.
1.8.1.2 — Click on the “Kitchen” button to enter the kitchen ticket window.
1.8.1.3 — Choose the dishes you need to print in the kitchen now. If that's all, click the "ALL" button. (Note: They are going to show you all the dishes on the package menu)
1.8.1.4 — After selecting, click the "SUBMIT" button to exit the "Order" page. You will print the dishes that have been selected on the kitchen ticket when leaving the page.
1.8.2 — Print kitchen ticket automatically
1.8.2.1 — First finish completing the order basket, editing the package menu and the kitchen message.
1.8.2.2 — After clicking the "Exit" key to exit the "Order" page, the program will print
automatically all dishes and kitchen messages that have not been printed in the kitchen on the kitchen printer.
When the current order is not complete but you need to open another one. You can temporarily save the current order to the device through the pending order and not transmit it to the server. And you can continue to complete this list later.
1.9.1 — Click the "Pending" key to exit the "Order" page.
(Note: The shopping cart must be new to use this function. )
1.9.2 — You can find the pending order list at the top of the keys on the "Service" page. Click the pending order to re-enter the "Order" page and continue the work.
2.1 — Select the ticket you need to divide. Click split to enter the Split Ticket window.
2.2 — Click "ADD" or "DEL" to add or remove a new ticket。 (Note: New tickets use currently unused table numbers and use numbers from largest to smallest.)
2.3 — Move it to the new ticket by clicking on the plate in the list above (vertical device) or left (horizontal device)
2.4 — If more divisions are needed. Repeat steps from 2.0.2-2.0.3.
2.5 — If a plate needs to be removed from the new ticket. Simply move it to the original ticket by clicking on the plate in the list below (vertical device) or to the right (horizontal device).
2.6 — The total that appears at the top of the window is the total of the original order, and the total that appears at the bottom of each list is the current total. (Note: The current total is not including VAT.)
2.7 — Click Ok to exit after division. After exiting, the program will return directly to the "Service" page.
3.1.1 — Select the ticket you are going to print.
3.1.2 — Click the "PRINT" button to print. The program returns to the "Service" page automatically.
3.2.1 — Select the ticket that you are going to print an invoice.
3.2.2 — Click the "Total" button to enter the invoice details window.
3.2.3 — Fill in the NIF / CIF and the name of the client at the top of the window.
3.2.4 — Click the "PRINT" button to print. The program returns to the "Service" page automatically.
On the "Service" page, find the notepad button below the restaurant icon and click to enter the notepad page.