software YiCanTable

Manual

YiCanTable It is a kitchen delivery management software for restaurant mobile device series software.
Some settings need to be made before using this software. First, connect to the host and update the database.

Software configurations

Before using this software, you must first configure to connect to the server. And then you need to configure its functions.

1. — Connect to the server

1.1 — Configure the device's WiFi network. In searching for the device's Wi-Fi network, select the same Wi-Fi network as the server. (In Android: 1-Settings 2-Wireless and 3-Wi-Fi networks)
1.2 — Find the server IP address. (In Android: 1-Settings 2-Wireless and networks 3-Wi-Fi 4-Click the icon in the upper right corner of the screen 5 — Wi-Fi settings)

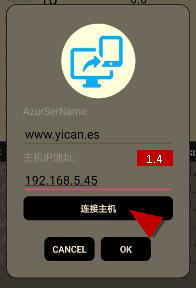
1.3 — Click the icon on the “Kitchen plate” page to enter the server IP address setting window. And enter the IP address of the server.
1.4 — Click the Connect to Server button , after viewing the reply message, click the OK button to exit.
* When editing the server IP address, be careful not to have spaces between the numbers.
* If no message is issued, the connection to the server has failed.

2 — Functions.

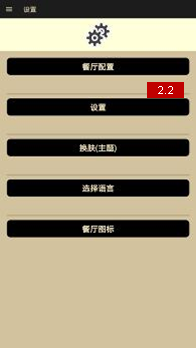
2.1 — Click the icon in the upper left corner of the "Kitchen Plate" page and select "Adjust" to enter the page.


2.2 — Click the "SET" button on the page to enter the window.

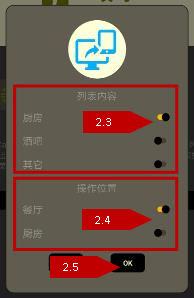
2.3 — Configure “List Content” 。Configure the list content to be displayed according to usage.
2.4 — Configure "Work Area". Set it according to the device user. The chef uses "Kitchen", and the waiter uses "Lounge".
2.5 — After configuring, click "OK" to exit.

3. — Return to the page “Kitchen plate”

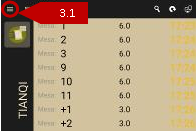
3.1 — Click the icon in the upper left corner of the software , select Cookware to return to the “Cookware” page.

Custom settings

Before you start using the software, you can also customize some settings.

1.—1. — Customize the software theme

1.1 — Click the icon in the upper left corner of the "Kitchen Plate" page and select "Setting" to enter the page.
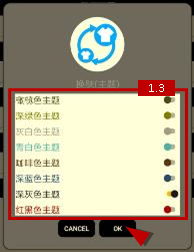
1.2 — Click the "Change Topic" button on the page to enter the window.
1.3 — After selecting your favorite color theme in the window, click the "OK" button to exit the window.

2. — Customize the software language

2.1 — Click the icon in the upper left corner of the "Kitchen Plate" page and select "Adjust" to enter the page.
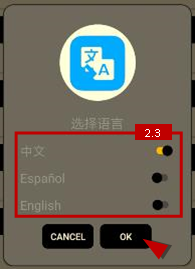
2.2 — Click the "LANGUAGE" button on the page to enter the window.
2.3 — Click on the language to be used and click on the "OK" button to save and exit the window. After exiting, the software will automatically change the language used by the software.
* The software uses the default system language of the device as the initial language of the software.

User manual

1 — Data update

1.1 — Automatic data update.
1.1.1 — Whenever the kitchen printer prints new content, the system will synchronize the relevant data in the list.
1.1.2 — Every 30 seconds, the software will automatically update the data. And update the content of the list.
1.2 — Manual data update
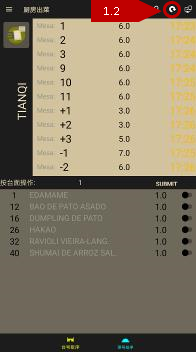
1.2.1 — You can update the data manually by clicking on the icon at the top of the "Kitchen plate" page, which allows you to update the contents of the list to the latest.

2 — Introduction to page content

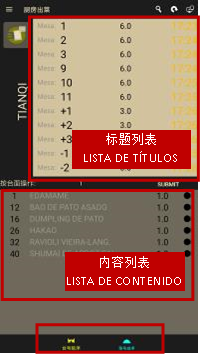
There are two lists on the "Kitchen dishes" page. The top (vertical device) or the left (horizontal device) of the page is a title list, showing all the titles. At the bottom (vertical to the device) or to the right (horizontal to the device) of the page is the content list, which shows the content of the title.
There are two options at the bottom of the page, sorted by dining table number or plate number. (Note: the menu package will be broken down into individual dishes, and will appear on the list)
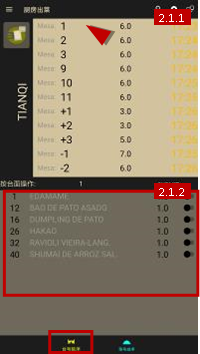
2.1 — Sort by dining table number.
2.1.1 — All dining table numbers will be displayed in the title list, ordered by dining table numbers (from least to greatest).
2.1.2 — The content list will show all the numbers and names of dishes that the dining table has. And order by the menu number number (from small to large).
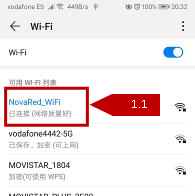
image398.jpg

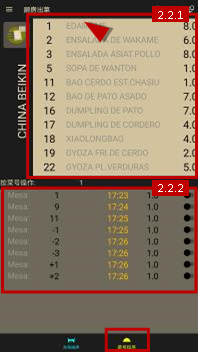
2.2 — Order by plate numbers.
2.2.1 — All the numbers and names of dishes will be shown in the title list, ordered by the menu numbers (from least to greatest).
2.2.2 — The content list will show all the dining table numbers who has ordered that plate. And order by dining table number (small to large).

3 — Make a mark on dishes that have been processed.

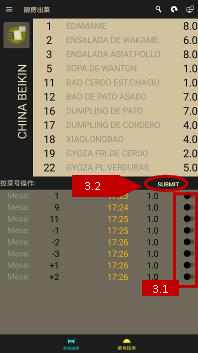
3.1 — At the end of each line in the content list, there will be a button to mark the completion of the work process.
3.2 — Click other titles in the title list, or click the "SUBMIT" button to automatically remove the marked content.
(Note: When Kitchen mode is active, the deleted rows will continue to appear on other devices with Lounge mode.)

4 — Seeker

We can use the search tool to search.
4.1 — Click on the "magnifying glass" icon at the top of the "Kitchen plate" page to enter the search window.
4.2 — Enter the number and click "OK" to search.
(Note: The search engine only searches for the row in the current title list.)