YiCanCarta It is a customer self-service software for restaurant mobile device series software.
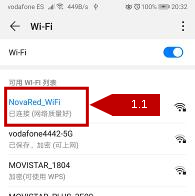
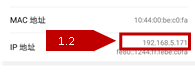
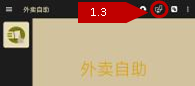
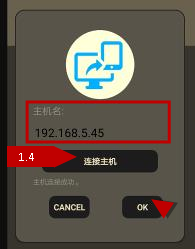
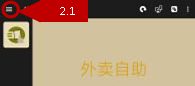
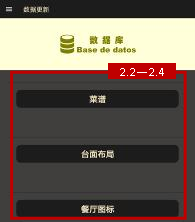
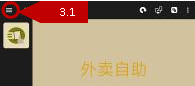
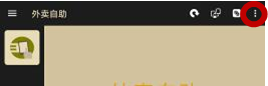
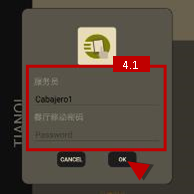
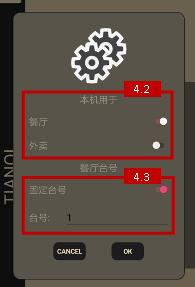
Some settings need to be made before using this software. First, connect to the host and update the database.
1.1 — Configure the device's WiFi network. In searching for the device's Wi-Fi network, select the same Wi-Fi network as the server. (In Android: 1-Settings 2-Wireless and 3-Wi-Fi networks)
1.2 — Find the server IP address. (In Android: 1-Settings 2-Wireless and networks 3-Wi-Fi 4-Click the icon in the upper right corner of the screen 5 — Wi-Fi settings)
1.3 — Click the icon on the “Restaurant” page to enter the server IP address setting window. And enter the IP address of the server.
1.4 — Click the Connect to Server button , after viewing the reply message, click the OK button to exit.
* When editing the server IP address, be careful not to have spaces between the numbers.
* If no message is issued, the connection to the server has failed.
* The software needs the yican.es service to use.
2.1 — Click on the icon in the upper left corner of the “Restaurant” page to select the data update and enter the “Database” page.
2.2 — Click on “MENU” to update the restaurant menu data.
2.3 — Click “BASIC SETTING” to update basic restaurant settings.
2.4 — Click on “RESTAURANT ICON” to update restaurant logo.
3.1 — Click the icon in the upper left corner of the software , select Restaurant to return to the “Restaurant” page.
4.1 — Click the icon in the upper right corner of the "Restaurant" page and select "Setting" to enter the window.
4.2 — You must fill in the waiter's name and password before entering the window.
4.2 — Select the objective of the software service. "The restaurant" is only for customers inside the restaurant. "Takeout" is only for customers who come to the restaurant to pick up takeout orders.
4.3 — If you choose the restaurant as the software target, you must also choose whether you want to use a fixed table number. The fixed table number means that the device is used for one table only, and the table number is entered below. Rather, it means the device is for mobile use, enter the table number temporarily.
1.1 — Click the icon in the upper right corner of the “Restaurant” page to choose your favorite theme.
2.1 — Click on the icon in the upper right corner of the “Restaurant” page, select Language to enter the Window.
2.2 — Click on the language you are using and click on the OK button to save and exit the window. The software will automatically change the language of the software immediately.
* The software uses the default system language of the device as the initial language of the software.
1.1 — On the "Restaurant" page, click the "ENTER" button at the bottom (vertical device) or at the bottom left (horizontal device) to enter the order page.
1.2 — There is a menu list at the top of the order page (vertical device) or on the left side of the page (horizontal device). On the left side of the menu list is the category of dishes, and on the right is the menu of dishes.
1.3 — First select a category, find the dish you want to order, and double-click the dish name.
2.1 — When you click on the dish name, if there is detailed content about the dish, an information icon appears.
2.2 — You can enter the detailed content window of the menu package or dishes by clicking on the information icon.
3.1 — You can see the order list at the bottom of the page (vertical device) or to the right of the page (horizontal device).
3.2 — Find the menu package you want to modify in the order list.
3.3 — Click the EDIT button at the far right of the row where the menu package is located to enter the package modification window.
3.4 — You can see the number of packages in the upper left corner of the window. At the top of the window is the menu list that the package has.
3.5 — After clicking on the name of the dish to be replaced, a replaceable menu list will appear at the bottom of the window.
3.6 — Click on the name of the replaced plate and then modify the amount by adding or subtracting.
4.1 — Find the number of dishes you want to adjust in the order list.
4.2 — Click on the name of the dish and then adjust the amount with the plus and minus signs.
5.1 — After confirming that the order has been completed, click on the button below at the bottom to enter the order summary window.
5.2 — Fill in the amount the number of guests in the upper part of the window. Or fill in the name of the person who ordered the takeaway so that the restaurant can contact you in time.
5.3 — In the window there is all the content of your order. Including the contents of the menu package. At the bottom of the window is the order total.
5.4 — After confirming, click the "Submit" button and wait for the software's reply message.